Parameter Input and Analysis
This section of the manual covers the two sections of VoiceSauce involved in inputting and measuring data - Parameter Estimation and Manual Data Input.
Parameter Estimation is where VoiceSauce is instructed to make various
acoustic measurements. Manual Input is a section where users can load
in previously measured data, such as a pitch track calculated using a
different algorithm, and instruct VoiceSauce to depend on it when
calculating other measurements. Nearly all users will use Parameter
Estimation, Manual Input will most frequently be used only to correct
VoiceSauce.
Parameter Estimation
|
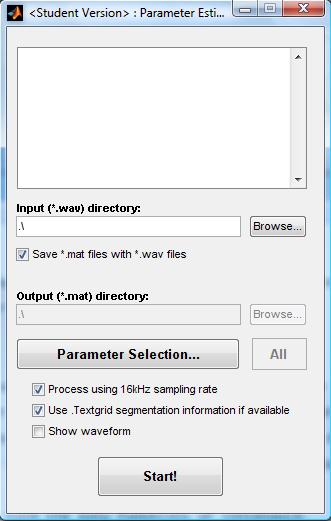
The Parameter Estimation window is reached by clicking on the appropriate button in the VoiceSauce home screen.
The topmost box displays all the files VoiceSauce has been directed
to analyze. When the window is first opened, this box will be blank.
The directory containing the files to be analyzed needs to be loaded
into VoiceSauce. This can be done by directly typing in the file path
to the directory in the field marked Input (*wav) directory:, or locating the directory by using the Browse... button. When a directory is loaded, VoiceSauce will list all the sound files inside in the topmost box.
Below the input field is a toggle box, Save *.mat files with *.wav files.
This option is checked by default and will instruct VoiceSauce to save
the *.mat files, which contain the acoustic measurements, in the same
place as the sound files. If this option is deselected, the Output (*.mat) directory: field will become active, allowing the user to specify where the result files should be saved. |
 |
|
Unless instructed otherwise, VoiceSauce will make all possible
acoustic measurements. To prevent VoiceSauce from making unneeded
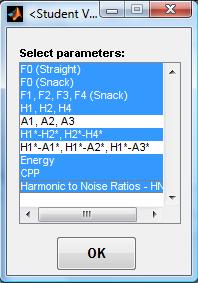
measurements, click the Parameter Selection... button. This will create a pop-up window listing the various measurement options. These include:
- F0, as measured by the Straight algorithm
- F0, as measured by the Snack algorithm
- F0, as measured by Praat
- F0, as measured by Sun's Subharmonic to harmonic ratio algorithm
- Formant frequencies by Snack and by Praat
- Harmonic amplitudes
- Formant amplitudes
- Corrected relative harmonic amplitudes
- Corrected relative harmonic/formant amplitudes
- RMS energy
- Cepstral Peak Prominence
- Harmonic to noise ratios
- Subharmonic to harmonic ratio
- Strength of Excitation
By default, all possible measures are selected. Clicking on a measure deselects it, removing it from the analysis. It
is possible to selectively add new parameter values to, or overwrite
parameter values in, an existing .mat output file. For example, if a
new version of VoiceSauce contains a new parameter that was not
available (or for some reason was not selected) when a .mat output file
was previously produced, selecting only that new parameter now will
cause the old .mat file to be updated with this new parameter, not
affecting any previously-calculated, or manually entered, parameters
(as long as they are de-selected now). As another example, suppose a
previous .mat output file contains harmonic amplitudes estimated based
on the STRAIGHT F0, but now you want to replace those based on Praat's
F0 estimates. Selecting only the harmonic amplitude parameters that you
want re-estimated (and under Settings, changing the F0 basis) will
cause VoiceSauce to over-write the old values with the new ones, not
affecting any other previously-calculated or manually-entered
parameters (as long as they are de-selected now). Multiple
passes through VoiceSauce, each pass estimating a different set of
parameters, is also a way to process large files that run up against
memory limitations. For example, leaving Subharmonic to harmonic ratio
and Strength of Excitation out of the first pass, and running them
separately in a second pass, has allowed us to analyze longer files
than would otherwise be possible. |
 |
Near the bottom of the Parameter Estimation screen are three additional toggle controls.
The first, Process using 16 kHz sampling rate, controls whether
or not VoiceSauce downsamples an original sound file with a sampling rate
higher than 16 kHz before doing any analysis. This is recommended for faster
analysis, especially by STRAIGHT, which increases processing time exponentially with higher sampling rates.
This box will not affect files with a sampling rate below 16 kHz – whether the
box is checked or unchecked, the sampling rate will be unchanged.
Use .TextGrid segmentation information if available tells
VoiceSauce to look for labeled Praat Textgrids accompanying the sound
files. If this is selected, VoiceSauce will only analyze segmented and
labeled portions of the sound files, which can dramatically reduce
analysis time, especially for long sound files. By default, VoiceSauce
will only look in the first tier of a TextGrid and ignore any empty or
blank space labels. These options can be modified in the Settings section.
|
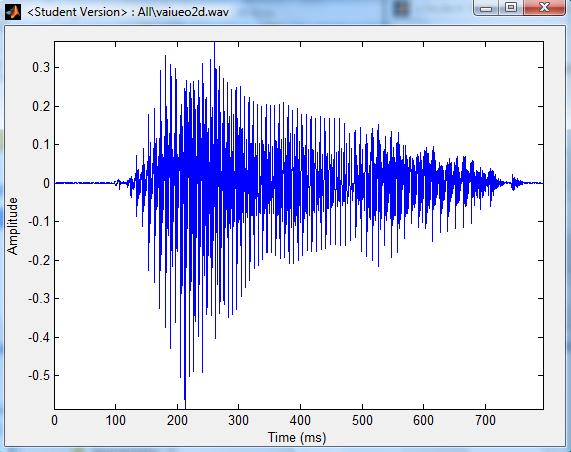
The last toggle, Show waveform will open a separate pop-up
window, displaying the waveform of the first sound file in the
directory. The user may examine the waveforms of additional files by
selecting them in the Parameter Estimation window.
The Waveform window can be removed by either closing the window or by unchecking the Show Waveform box in the Parameter Estimation window. |
 |
|
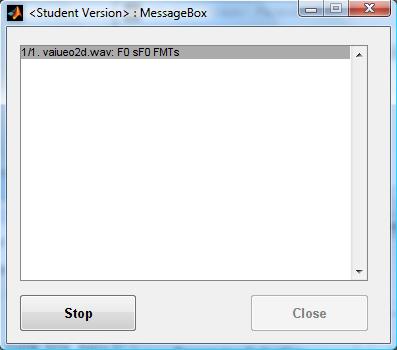
To tell VoiceSauce to begin the analysis, click Start! A message box will pop-up indicating the progress of the analysis. This window has two buttons: Stop and Close. When the analysis begins, the Close button will be grayed out. At any time, the analysis can be stopped by clicking the Stop button. Once the analysis is complete, or when it has been stopped, the Close button will become active. Click it to close the window and return to the Parameter Estimation window. |
 |
Manual Data Input
Introduction
The manual data input screen is accessed by clicking on the appropriate button in the VoiceSauce home screen.
The objective of manual data input is to:
- Allow the user to overwrite portions of output results
calculated by VoiceSauce with data generated by an external program or
by hand.
- Allow the user to have access to quick comparisons between VoiceSauce calculations and external calculations.
In order to modify VoiceSauce data, parameter estimation must first
be run to generate a draft version of a .mat file. Overwriting of
VoiceSauce generated data is achieved by extracting the information
from an external data file and injecting it into the previously created
.mat file. After this step occurs, the modified .mat file can then be
treated like a normal VoiceSauce .mat file. For example, the modified
file can be:
- Output to a text file via Output to Text,
- Output to an EMU file via Output to EMU,
- Displayed with the desired parameters via Parameter Display, and
- Most importantly, reloaded into Parameter Estimation and used to recalculate VoiceSauce measurements
As an example, previously generated F0 calculations can be modified
by the user, perhaps through a different algorithm, and reloaded into
Parameter Estimation. Rerunning the parameter estimations will as a
result alter the previously calculated harmonic locations, which are
dependent on F0 estimation.
Inputting Data Manually
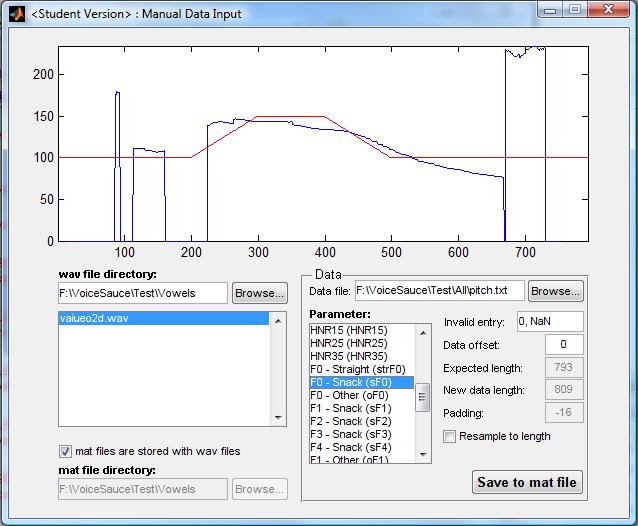
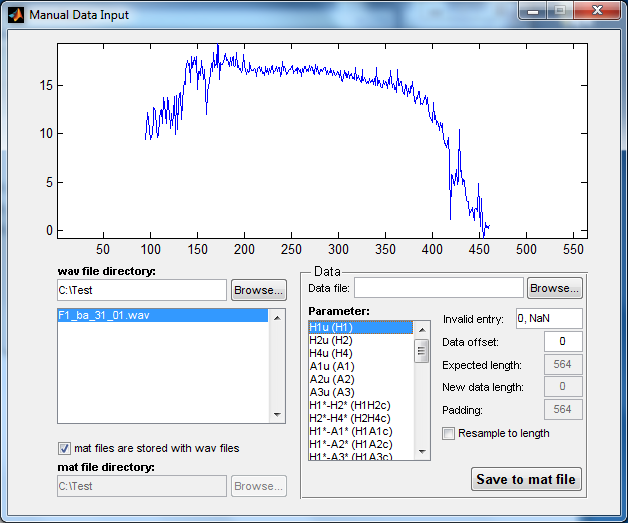
At the top of the window is the parameter display box. When the window is first opened, this box will be empty.
Modifying a mat file can be done in four steps:
- Load wav file - on the left side of the
window, users can specify the directories that contain the wav and mat
files in which to modify. To overwrite VoiceSauce data, the associated
sound and mat files must first be indicated. This can be done by
directly typing in the file path to the directory in the field marked wav file directory:, or locating the directory by using the Browse...button. When a directory has been indicated, all the wav files in that directory will be displayed in the box below.
- Load mat file
- By default, VoiceSauce looks for the original output mat files in the
same directory as the wav files. If the mat files are stored elsewhere,
deselect the mat files are stored with wav files toggle. The field below it will activate. Input the mat file directory by directly typing in the file path in the field marked mat file directory:, or locating the directory by using the Browse... button.
- Load external data file - after loading the wav and mat files, the external data to be used can be loaded in the Data File field on the right hand side. As with the wav and mat files, this file path can be directly typed or selected using the Browse... button.
The
file format for the external data file is very simple. This file should
be a basic text file that includes a column of numbers intended to
replace the original data. No labels or headings are required.
Please see the example below for an example of the text file.
- Selecting the parameters to overwrite - once the data file has been loaded into VoiceSauce, the user may select which parameter to overwrite in the Parameter: box.
When a specific parameter is selected, the original data will be
displayed in the top box in blue. The new data, from the data file,
will be displayed in red for comparison. This allows the user to compare data generated by different programs/algorithms quickly.
- Optional parameters - there are three options the user may choose to control how the data file is interpreted and aligned.
- Invalid entry: tells VoiceSauce which values to ignore. By default, these are set to 0 or NaN.
- Data offset: By default, this value is set to 0.
Any positive value will shift the data file track to the right by that
amount in milliseconds. A negative value will shift the track to the
left by that amount in milliseconds.
- Resample to length:
VoiceSauce expects the input data file to have a value at every
millisecond, but this may not be true for all input files. For example,
an input pitch track may only have a measurement every five
milliseconds. In that case, when this option is deselected, the track
will only apply to the first fifth of the file. When Resample to length
is selected, VoiceSauce will stretch the track (with interpolation)
across the length of the sound file.
Finally, to overwrite VoiceSauce output with the input data file, click the Save to mat file button.
Manual Data Entry: An Example
This example will demonstrate the process of substituting external
F0 data for VoiceSauce calculated F0 in a preexisting mat file.
Here is the text file with the F0 data we wish to use. We called this
file F0example.txt, and it contains a column of 15 fundamental
frequency values.

- First, we need to load the files for the data we wish to
modify. In this example, our mat file and wav file reside in the same
location, so we leave mat files are stored with wav files checked.
By default, VoiceSauce displays the data corresponding to the first
parameter in the box, in this case, H1. Data calculated by VoiceSauce
will be shown in blue.
- We
wish to modify straight F0 data for this mat file, so we select F0 –
Straight in the parameter box. Now, the parameter display box will show
the graph for straight F0, and we can proceed to load the data we wish
to use as a substitute, located in F0Example.txt.
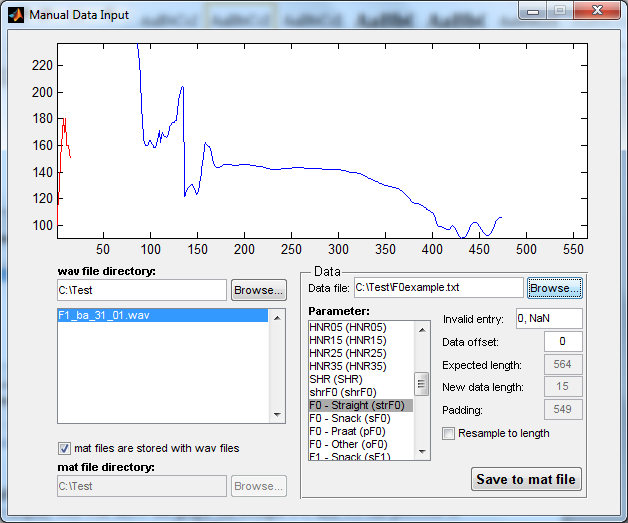
- Notice that our F0 data, shown in red, does not
match up with VoiceSauce’s F0 data. This is because each of the 15
numbers in our example file, by default, corresponds to one millisecond
in the sound file. There are two ways to fix this, each with different
intended results:
- Perhaps we want the 15 data values to span the length of the entire sound file. If this is the case, we check the Resample to length button and VoiceSauce will automatically interpolate our data for us.

- Perhaps
we wish to have exactly 15 milliseconds of F0 calculation in the
original mat file. In this case, we leave Resample to length unchecked
and instead change the value in the Data offset box.
Say we only want F0 calculations for milliseconds 440 to 455. Then, we
type in 440 into the box and VoiceSauce automatically shifts the data
for us.
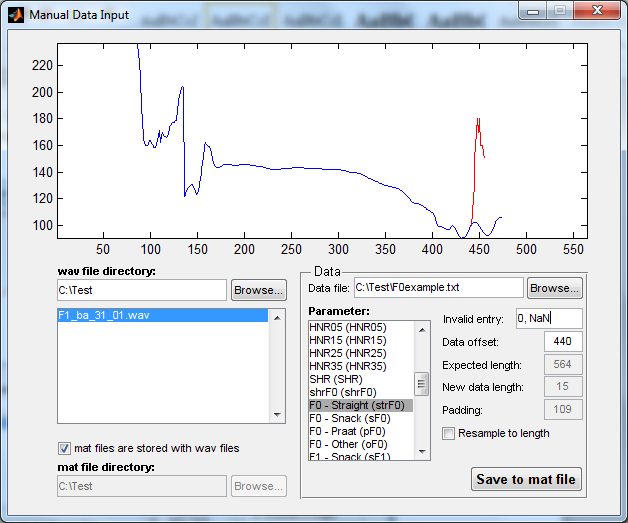
- Lastly, we click Save to mat file
to replace the original mat file with our new and updated one. Note
that the original VoiceSauce calculations will be wiped after you click
save regardless of whether you choose resample to length or data offset.
We now have an updated version of the mat file that includes our own F0 data. We can now output this data to text via Output to Text, or rerun Parameter Estimation to re-generate other measurements such as harmonic values based on the new F0 data. To do the latter, make sure to select only the parameters that you wish to recalculate!